2022 Mac Studio versus 2009 Mac Pro Review

Mac Studio vs Mac ProMy 2009 Mac Pro has gone quite a distance with me, and as an investment it’s probably one of the highest returns on capital I’ve made given the amount of consulting work it’s churned out with me. I’ve kept it reasonably upgraded, added memory, PCI SSDs and a Radeon RX580 so it would run MacOS Mojave. However, as the operating system upgrades became harder to keep up with, and basic things like memory bandwidth and SSD performance leapt further ahead, it’s become time to send this friend out to retirement.

I’d have upgraded this warhorse some time ago, but Apple’s 2019 Mac Pros landed during a period of budget consciousness, and shortly later, the announced transition to Apple Silicon meant I’d be waiting until an ARM-based machine with a reasonable amount of memory was released. My Mac Pro has 48GB of RAM, and many of the jobs I run chew up 20GB or more of memory, meaning that even a 64GB memory (especially shared with the GPU) wasn’t going to leave much in the way of future-proofing.

But when the new Mac Studios were announced, I finally had something that looked like a reasonable replacement, and I pre-ordered on announcement day.

Now that I’ve had this machine running in place for about two weeks, I thought I’d share my subjective experience moving from what was near the top-of-the-line Mac thirteen years ago to a similar candidate today.

Performance. Yes, It’s Amazing.

While I do regularly use Lightroom and the Affinity suite of tools, I don’t do a lot of video or multi-media work on a daily basis. The little bit of tinkering I’ve done with these tools lives up to the various YouTube reviews, and obviously it’s a quantum leap from the old machine.

But I’m principally doing software development work, and chewing through tens of thousands of markdown files on a regular basis. One project I deal with daily is an Astro.js project with over 10,000 pages, so lots of file I/O… My build time went from 30 minutes down to less than 10 minutes, which alone is a nice productivity win. The measurements I made comparing the SSD I/O shows a 5x improvement, so that’s on par.

The performance increase while using the machine for what we’ll call “stuff” is subjectively staggering. Basic web browsing is epically fast, and Visual Studio Code is actually snappy. Something has happened over time where using DevTools in Google Code had become a true exercise in patience, and while I won’t go as far as to say it’s pleasant on the Studio, it definitely is workable again.

I won’t re-hash benchmarks and stress tests… There’s plenty to be found on-line, and your use cases and workflows are likely much different from mine.

Rather, I’ll address some other concerns and questions that I had while reading forum posts on MacRumors and waiting for the machine to actually show up.

Fan Noise… Is the Mac Studio the Loudest Mac Ever?

One issue that received a lot of attention relates to fan noise, and there seemed to be ample criticism of the default fan speeds and the fact that the Studio’s fans never seem to stop spinning even when the machine is at idle. Some users have reported “whistling” noises, and I suppose it’ll remain to be seen if there is some sort “Fan-Gate” for folks who have apparently sharper hearing than my own.

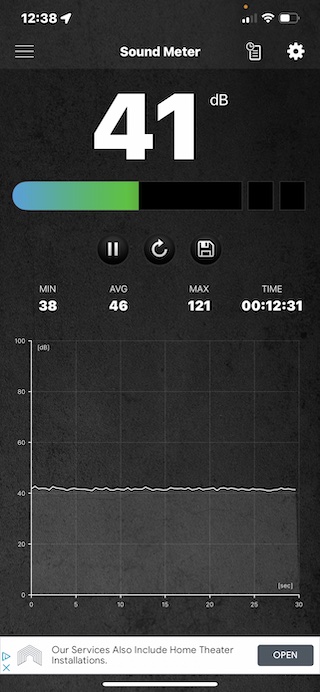
What I can tell you is, coming from a vintage MacPro sitting under my desk, the MacStudio is as silent as I can imagine. I downloaded a audio meter app to my phone and took measurements below, starting with no computer running at all…

Office Background – No Computers

From here, with the Mac Pro running I took measurements from my desk position…

Mac Pro Noise Level at Desk Work Positon

…and then with the Mac Studio…

Mac Studio Noise at Desk Work Position

What you’ll notice is that the measurement with the Mac Studio running is actually about as quiet as the room with no computer on at all. And to be completely fair here, a went from a regular monitor to an Apple Studio Display that has two internal fans, so there’s honestly the potential for monitor fan noise somewhere in this measurement as well.

So the short answer is, at least for me, this computer is about as close to silent as I could imagine in my environment. Is it louder than a Mac Mini? I have no idea. I don’t have a Mac Mini to compare it to. But if you’re coming from a legacy Mac Pro, I doubt you’re going to be kicking yourself over any increased noise from the machine.

Power Usage… How Many Years to Payback the Cost of the Mac Studio?

TL/DR… Too many. But still.

Another potential benefit one user pointed out that I hadn’t initially considered was power consumption. I tend to leave my development workstation on overnight because I have background tasks that are collecting data, and I have file syncing tasks that run at odd ours. So out came the Kill-a-Watt for a quick comparison between the two machines sitting at idle…

Mac Pro Idle Power Consumption
Mac Studio Idle Power Consumption

That 10x difference in power consumption was an unexpected benefit… Now granted we’re not yet suffering from the same sort of crazy electric rates I guess people in the UK and Europe are starting to see, but looking at my Arizona utility rates, my quick math here suggests I’m going from about $15 per month in costs leaving that Mac Pro running year round, and dropping it down to about $1.50, so a savings of around $150 a year or so. It’s not like that means the machine’s paying for itself in power savings by any means, but it’s a nice bonus… Especially considering much of that Mac Pro power usage is probably going out as heat that I’m spending most of the year trying to AC its way out of the house too.

Would I Buy the Mac Studio Again?

In a heartbeat. It’s the fastest Mac ever made, at least until the new Mac Pros get announced. And as much as I enjoyed my last Mac Pro, and as much as the upgradability bought me many more years of service, I couldn’t justify buying the 2019 Mac Pro, and I doubt the 2022 or 2023 Mac Pro is going to be much different in that regard.

I’m expecting I’ll get five or more years out of the Mac Studio, maybe longer if my workflows don’t get too much more taxing. For what I’m doing right now, so many things have become instantaneously fast, and the rest take just the right amount of time to fit in a quick trip to the coffee maker.

What Does it Look Like?

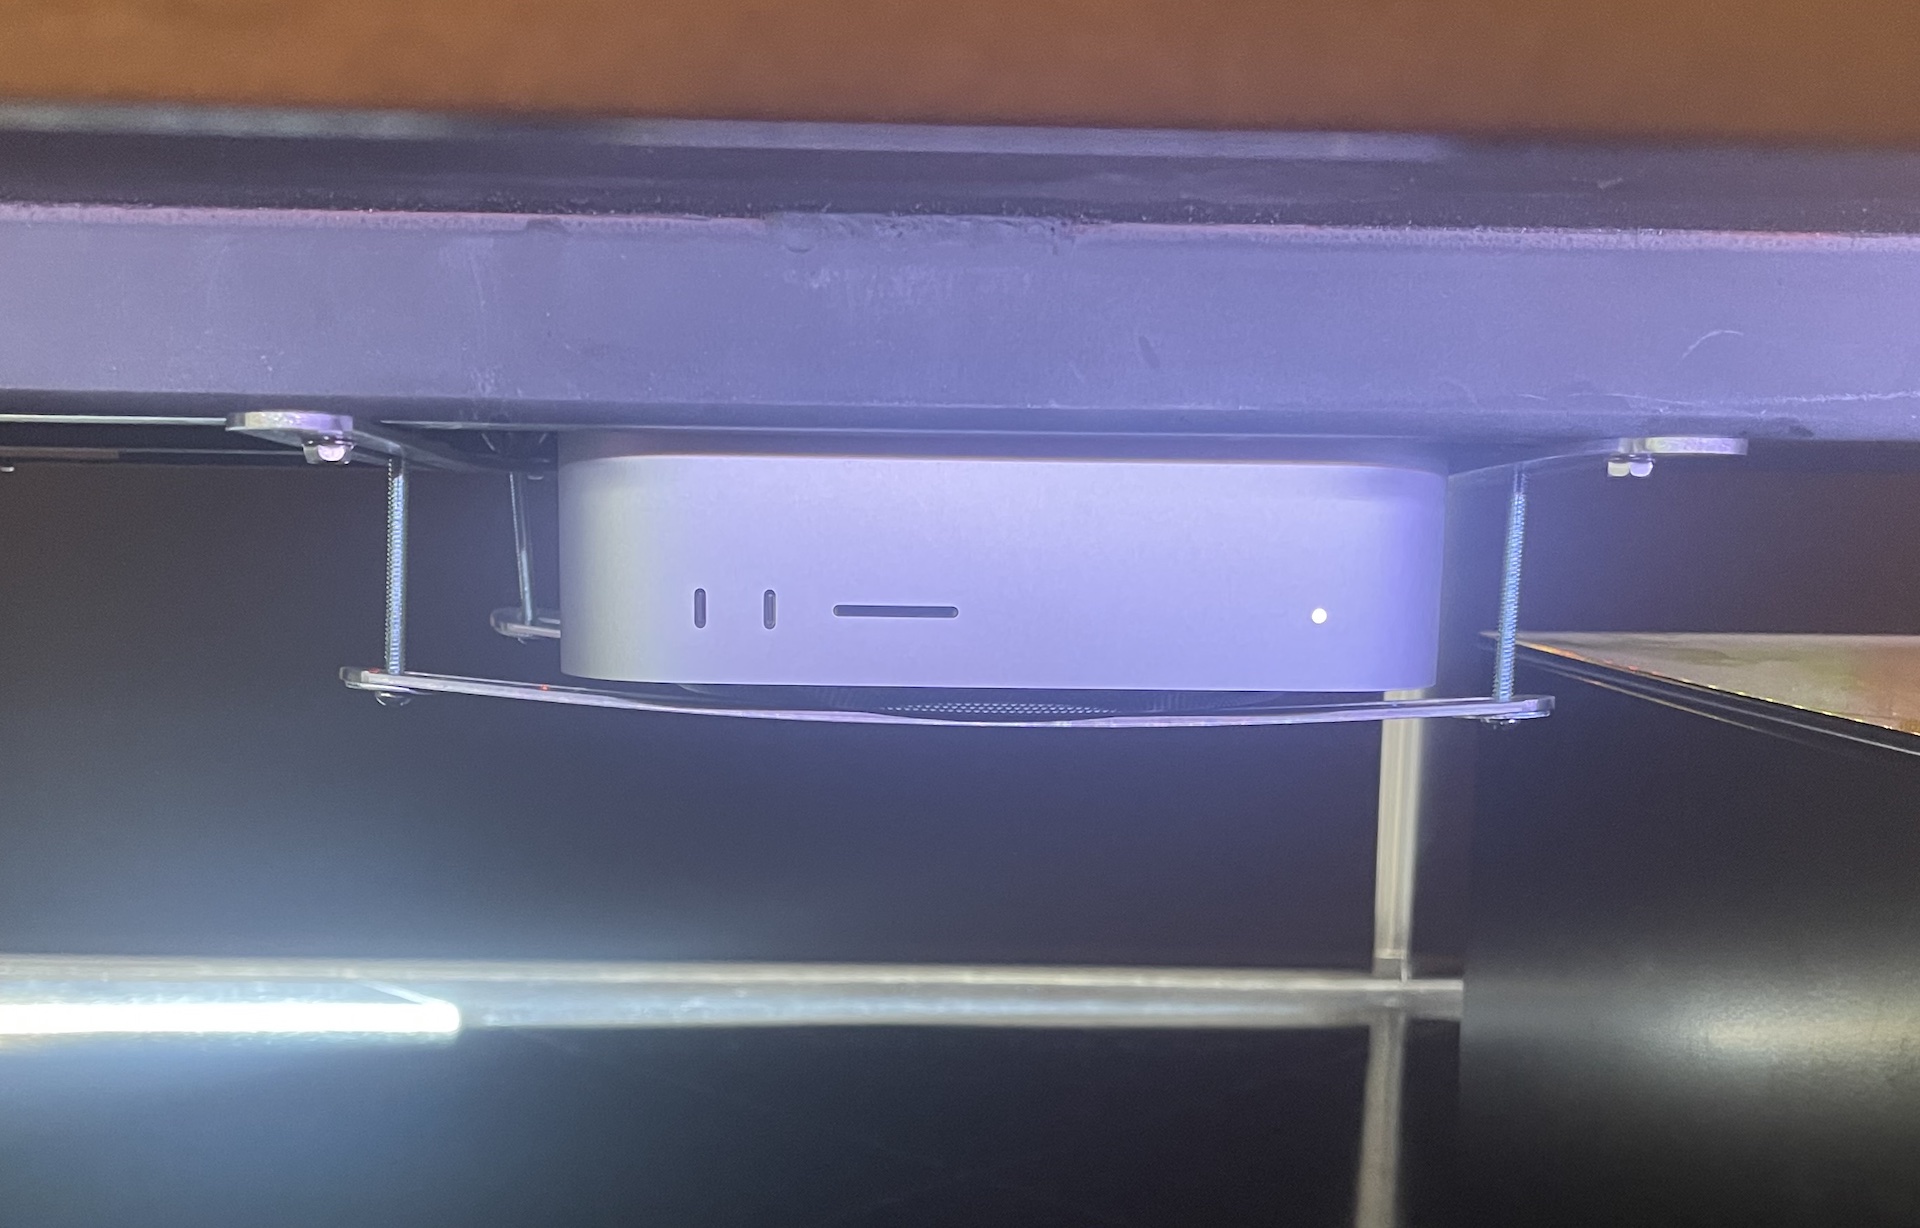
A review wouldn’t be complete without a couple of quick installation shots and some discussion of the way I set this machine up. My steel monster desk had framing that allowed me to use self tapping metal screws to mount brackets to hold the studio right near my work area…

Mac Studio Desk Mount
Mac Studio Desk Mount (Front View)

…which let me route most of my cabling under the desk. I only have an ethernet cable and a power cord coming up the desk leg now, which is incredible if you’d seen the rats nest of cable the Mac Pro demanded.

As a result, my desk is even more streamlined and I’m one step closer to OCD nirvana here… Check out the images below. And thanks for reading.

Mac Studio Desk Setup 1
Mac Studio Desk Setup 2
Mac Past Present Future

Ultimate OCD Desk Organizer

I spend a lot of time at my desk, and it accumulates a lot of random stuff. Random critical stuff. My wallet. Glasses. Two types of glasses sadly. The tiny Apple TV remote that sprouts little feet and hides under the mail. Along with my Bluetooth headset, multi-tool, USB drives and other bobbles that I need on a semi-regular basis and find myself spending exactly 3.6 minutes each day trying to find under various bits of paper or books or anything else that’s landed on my work surface.

So I built this…

When the frustration level started to peak, I had started looking at various under-the-monitor shelves or other types of trays or something that would let me give all of these little desk minions a home of their own, but couldn’t find anything that really looked right.

Ideally I wanted something that was slightly pitched so that whatever I’d put there was visible and accessible from my seated position, and that meant it’d need to be textured in some way to keep items from sliding off. And it needed to fit the space under my screens, which meant fitting around a relatively large base for the three monitor stand.

So I quickly figured out I was going to have to build something.

I wound up laying out the objects I wanted to store on a cardboard template that fit the space under the monitors, then made a pattern in Infinity Designer on a few pieces of paper. I cut a piece of 3/4″ MDF in the same shape as the cardboard, then used spray adhesive to glue the pattern down.

Then came the router. It’s been a long time since I’ve had the router out and I forgot what a mess it makes when you don’t have a proper dust collection setup. I’m still shaking MDF dust out of my gym shoes.

But I did get the shapes all routered out, sanded and then screwed the shelf into some angled legs. A couple of turns in the drill press to make holes for USB cables for the phone charger, USB hub and headset dock, and it was ready to paint. I sprayed a semi-gloss black base coat, and then finished the insets by hand in dark blue which contrasts nicely with the other colored accessories on the desk.

I routered out five spaces for different pairs of glasses which in retrospect looks compulsive, but that’s what I had hiding on my desk when I took inventory. It turns out now that everything has a storage spot, I’m able to find specific pairs of computer glasses and distance glasses consistently because they get put away right away, and I probably just needed two slots. Still, I know right where the spare pairs live if I need them.

It was a fun Saturday project and it’s definitely helping me keep the key things I need to find right in front of me. If you’ve got the wood working skills and your desk is half as messy as mine was, it’s a worthwhile weekend distraction.

Does CloudFlare’s Rocket Loader Help with Core Web Vitals? Maybe.

Like many of you I’m sure, one of my sites took a little hit from Google’s June Core Web Vitals search ranking update, and I’ve been spending a lot of time digging into these number in an attempt to find a shortcut or two that might help get my metrics up and recover a few search positions.

Checking Your Core Web Vitals

A great tool for measuring Core Web Vitals statistics is the Google PageSpeed Insights test page located here…

https://developers.google.com/speed/pagespeed/insights/

…which allows you to submit a URL and then let Google tell you what it thinks of the page. There are another of other tools around that use the LightHouse APIs and try to measure these metrics, but I’m assuming this is likely the closest approximation to what Google uses for actual ranking results.

Weird Things to Know About the PageSpeed Insights Checker

There are a few things to note about using this particular tool.

First, take note that the page reports different data for mobile and desktop analysis. The mobile analysis is probably what you care about since Google announced mobile first ranking, even for desktop search results. For the “Lab Data” section of the mobile results, the measurements look truly dreadful in most cases, but if you read the fine print Google is performing the mobile analysis as though you’re on an ancient Android phone accessing the internet from a 3G network in central Timbuktu. So for practical purposes, these measurements should be treated as relative measurements and not absolute reflections of what a user on a more up-to-date device on WiFi or a modern cellular network.

Second, it reports a lot of results that don’t really have anything to do with the test you run immediately ran. In particularly, the top part of the results page shows “Field Data” which is telemetry collected from real-world Chrome users. You won’t see these values change from test to test because it’s on-going data collection from a 28 day window of live visitors. If you’re tuning your site, you won’t see these numbers change for several days at a minimum, and even then only if you’ve made a substantial tweak.

Finally, the “Lab Data” section, which is the actual data from the test you just ran, will vary by quite a bit from run to run. If you change something and want to really measure the difference, you need to run this test multiple times and analyze the aggregate results.

JavaScript weighs in on many of the dimensions of the Core Web Vitals statistics, and in looking into the detailed breakdown of the diagnostics, I noticed the CloudFlare’s Rocket Loader script was one of the heavyweights that PageSpeed Insights said was contributing negatively to multiple statistics.

What is CloudFlare’s Rocket Loader?

If you’ve been around the site here for long, you know I’m a big fan of CloudFlare, so much so that I actually starting buying some of their stock (and for full disclosure, other than as a very small share holder, I have no financial relationship with them.)

Their Rocket Loader optimization is available as part of their free tier and attempts to optimize the way JavaScript files are delivered to site visitors. For detailed description of what Rocket Loader does, this link from CloudFlare’s blog probably describes it best…

https://blog.cloudflare.com/too-old-to-rocket-load-too-young-to-die/

The TL/DR version is that when CloudFlare caches your site content, it figures out which JavaScripts are on the page and then bundles them up into larger requests so that they can be more efficiently cached and delivered to the browser. This optimizes a lot of issues related to asynchronous loading, scripts that interact with the DOM and more, but in general Rocket Loader is supposed to help with things like Core Web Vitals.

Rocket Loader versus Core Web Vitals Deathmatch!

To put Rocket Loader to the test, I ran multiple tests against the multiplication worksheets page on DadsWorksheets.com, which is one of the higher volume pages on the site and one where I’ve been doing most of my Core Web Vitals optimization work.

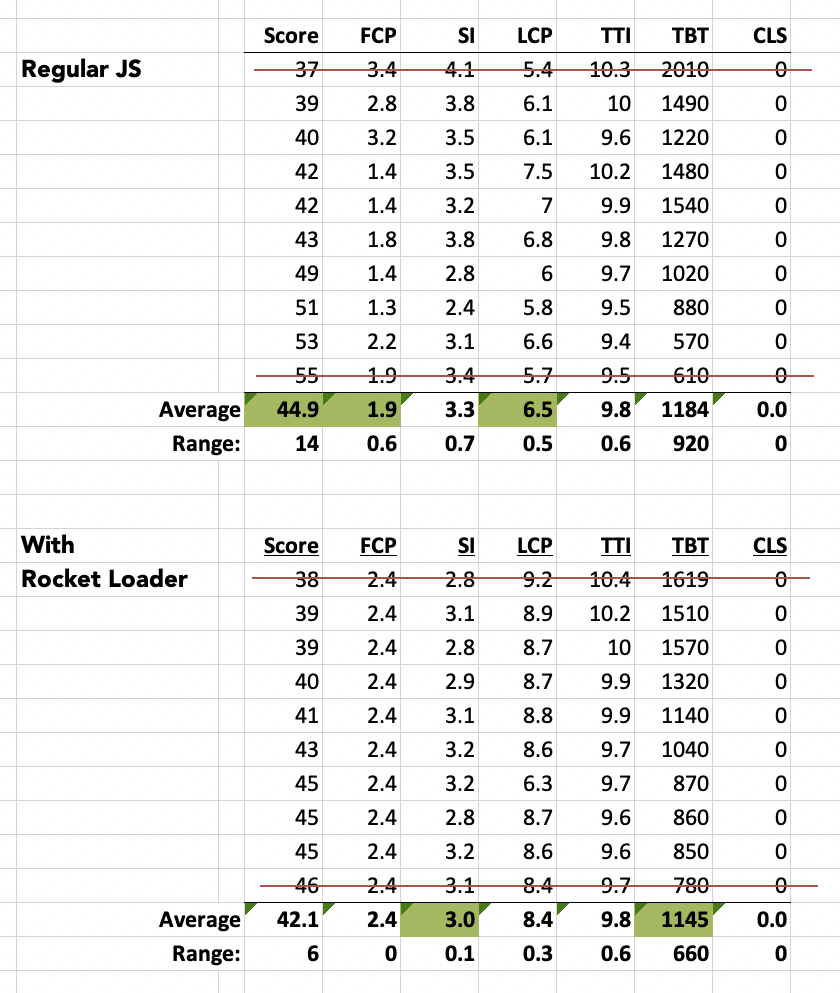
I ran the test ten times each with Rocket Loader enabled and just with regular JavaScript, threw away the best and worst score from each group and then averaged the results. The data looks like this…

To make that just a little easier to compare, here’s just the average rows…

Counter intuitively, the PageSpeed Insights score with Rocket Loader enabled seemed to be close to 3 points worse than running regular JavaScripts on the site. But as usual with Google, the story is a little more complicated.

An interesting point in Rocket Loader’s favor comes from taking note of the ranges returned in the test numbers… Rocket Loader seemed to substantially reduce the variability in the metrics compared to regular JavaScript. This definitely tells me Rocket Loader is doing something (arguably something positive) in terms of the way the site behaves.

What seems to throw the score metric off is primarily First Content Paint (FCP) and Largest Contentful Paint (LCP). Both of these numbers are meaningfully higher. And given that version 8 of the Lighthouse score metric assigns a whopping 25% weighting to LCP, it’s pretty obvious that’s the culprit. But why?

What the Heck is Going On?

I’m still guessing at what this data is telling me, but I have a pretty good suspicion about what’s going on. The site presently is statically generated by Nuxt.js, which loads a ton of small (and not so small… manifest.js? Seriously guys?) JavaScript files on each page.

I suspect Rocket Loader is bundling up and loading all of these files in one big gulp, which is great from the consistency point of view, but apparently not so great in that this load and rehydrating is getting in front of the render pipeline with the largest paint element in it.

What that means is my case here may be slightly pathologically and atypical, but it’s definitely one of those reasons why you don’t just blindly assume flipping a switch on a dashboard is a shortcut to great performance.

So What Am I Doing Next?

My hope is I can untangle those and make sure the largest (and first) contentful paint are handled before the JavaScript needs to execute, in which case both the FCP and LCP numbers should come down, leaving the small SI and TBT advantages Rocket Loader contributed.

LCP continues to be a struggle for me for some reason, not the least because the static build process with Nuxt is unbelievably slow on a site with over 10,000 pages. I have some hopes Nuxt 3 will be better, but I’ve got on my to-do list to look at Vite and vite-ssg+vite-plugin-md+vite-plugin-pages in the near future, but in the short term I’m siloed. If you have experience with that Vite stack, let me know if the comments below how it went.

I think the end game is to leave Rocket Loader enabled and struggle through optimizing my LCP issues away. I’ll follow up with another post if I make any interesting progress, but if I don’t, the numbers don’t lie… And I may wind up switching Rocket Loader off until I’m on a less complicated static deployment.


Vue-CLI and Single File Webpack Bundles

As I spend more and more time in the Vue.js ecosystem, I’m developing an a much greater appreciation for the time the core team has spent developing tools that make managing the project configuration.

That said, a big part of managing a Vue.js project still requires a lot of Webpack knowledge… More than I have, unfortunately.

Today I was working on a sort of micro-application that would be embedded on various web pages that I really have no control over. More specifically, it’s a web app that enables consent management for the CCPA privacy regulations, and it handles conditionally popping open a small UI for California visitors and then providing the opt-out signals to upstream code like prebid.js.

This app needs to load on all sorts of third-party web pages, and ideally the functionality would be enabled by simply including a JavaScript in the header of the page before the rest of the site’s advertising technology stack would load. This means the Vue.js app doesn’t really own the page, and it really needed to load as a cleanly as possible in a single JavaScript file.

This took a little more wrangling that I’d expected, and much like my deeper dives into doing things like adding Snap.svg to Vue and Nuxt projects, it required a bit of a deeper dive into Webpack and the configuration chaining behavior of the newer vue-cli generated apps.

Injecting your own mount DIV

One of the things your Vue.js project always needs is a place to mount itself on the web page. Generally, your project will have some sort of HTML template that hosts it, and often your whole site may be the actual Vue.js app and that simple HTML file is all you need to deploy.

More often than not, however, I’m loading Vue.js apps onto existing pages, and that involves just adding a <div> element somewhere with the right ID in an existing layout.

For this project, I had zero control over the host pages so I had to dynamically inject a mount point. To do this, I had to modify the main.js file in my Vue project to do something like this…

import Vue from 'vue'
import App from './App.vue'

let gMyApp = undefined;

document.addEventListener("DOMContentLoaded", () => {
  
    // Inject a private mount point div to display UI...

    let body = document.getElementsByTagName('body')[0];
    body.innerHTML = body.innerHTML + "<div id=myApp_mount />";
    
    gMyApp = new Vue( { render: h => h(App), } ).$mount('#myApp_mount')

} );

Inspecting the generated webpack configuration redux

In my previous article, I talked about inspecting the vue-cli generated Webpack configuration by using ‘vue inspect’ to eject a copy of the configuration, and then modifying it using webpack-chain in the vue.config.js file.

One detail that I missed in this earlier exploration was the need to eject a production configuration. To do this, you use the following command and your shell…

vue inspect --mode production > ejected.js

Without the mode command line variable, what you’re seeing is your development configuration, which can run a whole different chain of loaders and perform other Webpack mischief you’re not expecting.

vendors.js must go!

But back to my original problem of getting a single bundle as output from the project. By default, the Vue.js CLI will kick out separate bundles for your code, vendor libraries and any extracted CSS. Trying to hand this off to a third party and explaining they needed to include a dog’s breakfast of separate files on all of their site pages was a deal breaker, so figuring out how to merge all of these files in the production build was important.

The easy first step was to just stop Webpack from splitting the JavaScript into separate chunks. That’s actually Webpack’s default behavior, so all we need to do is get rid of some of the configuration passed into the split chunks plugin by vue-cli’s defaults. Using chain-webpack in vue.config.js, that looks something like this…

module.exports = {

chainWebpack: config=> {

   // Disable splitChunks plugin, all the code goes into one bundle.

   config.optimization
     .splitChunks( ).clear();

} }

Combining CSS and JavaScript in one Webpack bundle

That got the project down to a single emitted JavaScript file and a single CSS bundle. And that’s where things got interesting.

To get the CSS to reside with the JavaScript code, it needed to be packaged and injected. That mean undoing the extraction of the CSS into its separate file and then separately using style-loader to sneak it into the DOM when the JavaScript was executed on the page.

The first step was disabling the existing extraction process handled by the extract-css-loader. Again, inside vue.config.js in the chainWebpack:config function…

config.module.rule('css').oneOf('vue').uses.delete('extract-css-loader');
Running the build with that command in place got rid of the separate CSS in the dist directory. But, it didn’t load on the page. The bundle size actually went up, so it was making it into the bundle, but we needed one more step to actually do the DOM injection. Inspecting the config again made it clear nobody was picking up the output from the chain of CSS loaders, and what we really needed was to add style-loader to the end of the list to get it to do that last step for us…
config.module
   .rule('css')
      .oneOf('vue')
         .use('style-loader')
            .before('css-loader')
            .loader('style-loader')
            .end();

With that in place, the project kicked out a single .js file that had everything in it… vendor and project code, plus the css. And, the css actually got injected when the script ran. Perfect!

Bonus Episode! Renaming the Webpack Output File

As a final bit of convenience, I modified the webpack generated filename to use a date format necessary for this project. While normally the cache-busting hashes are super useful for making sure everything deploys in sync, in this case we wanted the filename to reflect the build date.
// Get the filename into the format we use for different builds.

let today = newDate();
let mm = today.getMonth() +1; // getMonth() is zero-based
let dd = today.getDate();
let yy = today.getFullYear().toString().substr(-2);

let dateStr = [ yy, (mm>9?'':'0') + mm, (dd>9?'':'0') + dd ].join('');

config.output.filename( 'myapp-'+ dateStr +'.js' )

Perhaps a little wordy, but it gets the job done.

Putting it all together in one webpack chain configuration

Putting all the parts together…
module.exports = {

chainWebpack: config=> {

   // Get the filename into the format we use for different builds.

   let today = newDate();
   let mm = today.getMonth() +1; // getMonth() is zero-based
   let dd = today.getDate();
   let yy = today.getFullYear().toString().substr(-2);

   let dateStr = [ yy, (mm>9?'':'0') + mm, (dd>9?'':'0') + dd ].join('');

   config.output.filename( 'myapp-'+ dateStr +'.js' )


   // Disable splitChunks plugin, all the code goes into one bundle.

   config.optimization.splitChunks( ).clear();


   // Disable the CSS extraction into a separate file.

   config.module.rule('css').oneOf('vue').uses.delete('extract-css-loader');

   // Take the CSS from the bundle and inject it in the DOM when
   // the page loads...

   config.module
      .rule('css')
      .oneOf('vue')
         .use('style-loader')
            .before('css-loader')
            .loader('style-loader')
            .end();
} }


One further caveat with this solution… If you’re using various CSS preprocessors, you’ll see when you inspect the Webpack configuration various loader chains for each of the individual CSS preprocessors (less, sass, scss, stylus) and you’ll need similar sets of rules to delete extract-css-loader and insert style-loader for each of those scenarios. For my project, I only needed to update the loader chains in…
config.module.rule('css').oneOf('vue')...
…but looking at the configurations there are a variety of other loader chains for different module types and for the different CSS preprocessors, so depending on what your project uses you made need to repeat deleting the extract loader and inserting the style-loader for those using additional chain rules.

Adding Snap.svg to Vue.js Projects Created with vue-cli 3.0

My front end tool chain has finally settled into something I’m getting comfortable with. But these tools don’t stand still, so the learning continues.

One of the higher traffic posts on this blog has been my discussion of how I integrated Snap.svg into my Vue.js and Nuxt.js projects. I wrote that article because while it wasn’t fun, it helped me learn a lot about Webpack configuration.

That article was written at a point in time when where I was maintaining standalone Webpack configuration files for my projects. A big part of the trouble with this approach is that it intrinsically couples a large number of external dependencies together. My Vue.js projects rely on a number of third party libraries, Webpack uses a collection of loaders and the build tool chain itself has a number of dependencies like ESLint and Babel that bring along their own school of remora fish.

So, you can understand why once you’ve got a fairly complicated project and build process configured in Webpack, that the last thing you typically want to do is touch it. It’s even worse when you introduce dependencies like Snap.svg that, because of their lack of module support, require mystical Webpack incantations to get them to work.

I just had to extract this slope intercept calculator from a project that was generated without the CLI, so I was using the older Webpack mysticism to get Snap.svg working. With the need to create this in a new project, startig with the latest Vue.js and the vue-cli was the natural approach… But that meant getting our friend Snap.svg working again. Read on to find out how…

How The vue-cli reduces webpack Configuration hell

Let’s be honest, not many people like working on Webpack configurations.

One of the things the vue-cli sets out to do is to hide away some of the complexity associated with Webpack configurations. This makes building compiled Vue.js projects a bit less intimidating, but it also allows the whole tool chain to be upgraded without breaking what would have been a hand-coded Webpack configuration.

There’s still a Webpack configuration hiding under the hood of course, it’s just that the CLI manages it. And if you upgrade Vue.js and it’s tool chain, in theory it becomes a seamless process because the configuration is “owned” by the CLI and it’s not a visible part of your project that you’ve been tempted to monkey around with internally.

This management of the Webpack configuration by vue-cli is in contrast to many other tools that “eject” a configuration when the project is first setup, or when you might need to make an unsupported modification. At that point, the Webpack configuration file is owned by the developer (lucky you!) and a future upgrade becomes something to potentially be feared.

Fortunately, vue-cli 3.0 introduced a new way to make modifications to the generated Webpack configuration without having to eject a configuration and be responsible for maintaining it forever forward.

Webpack chain: how to modify a vue-cli webpack configuration without ejecting

The magic comes from webpack-chain, a package that came out of the Neutrino.js project. It’s bundled into the vue-cli and the implementation details are a slightly different, but the documentation at the link above is useful for digging into individual options. There’s some examples specific to vue-cli at this link although they fell short of the complete reference at the actual webpack-chain documentation.

Webpack-chain allows you to create little configuration patches that get applied programmatically to the Webpack configuration that is built by a vue-cli project each time you compile. The advantage of this is that you only need to specify the eccentric bits of your project’s build configuration, and if you subsequently upgrade to Webpack 7 or Vue.js 5 all of the stock configuration provided by the rest of the toolchain should hopefully get upgraded appropriately.

An example of this is getting CSS preprocessors like Sass or Less running. Normally this would take some Webpack gymnastics, but the vue-cli does this for you when you configure a project and you never have to touch the actual Webpack configuration. As vue-cli gets updated to use later versions of Webpack or whatever CSS preprocessor you’re using, these upgrades will come along for free in your project without having to go back and touch the Webpack configuration. Woohoo!

Where you do need to go outside the box, you can do it by setting up a “chain” in separate configuration file. You may still have update your custom configuration bits in your chain on undertaking a major version upgrade, but those changes are scoped and isolated, and they’re definitely more succinct. I much prefer this compared to picking through 1000 lines of Webpack boilerplate and finding where I’ve done something outside the box.

The slightly inconvenient part of this is that the syntax of webpack-chain is slightly different from the JSON object structure you may be more familiar with if you’re a Webpack old timer.

As an example, let’s look at our friend Snap.svg.

Getting Snap.svg Working with VUE-CLI

As in manual configurations, we’ll use the imports-loader to load Snap.svg in our project. So once we’ve created a new project with vue-cli, we’ll need to install Snap.svg and imports-loader as appropriate dependencies…

npm install --save snapsvg
npm install --savedev imports-loader

We don’t need to explicitly install webpack-chain as part of our project as vue-cli already bundles this into itself.

To create a chain that gets applied to the vue-cli generated Webpack configuration, you need to create a file named vue.config.js in your project’s root folder. Here’s the entire file I’m using to pull Snap.svg into my project…

module.exports = {
  chainWebpack: config => {
    config.module
      .rule("Snap")
        .test(require.resolve("snapsvg/dist/snap.svg.js"))
        .use("imports-loader")
        .loader("imports-loader?this=>window,fix=>module.exports=0");

    config.resolve.alias.set("snapsvg", "snapsvg/dist/snap.svg.js");
  }
};

That will handle getting Snap.svg resolved and imported when we need to. Again, the webpack-chain documentation illuminate how this is mapped back to traditional JSON Webpack configuration structures, but you can see readily how you might setup other behaviors like plugins or other loaders.

All that’s left is to reference it in the source to one of our components, something in very broad strokes like this…

<template>
  <div >
    <svg id="mySVG"  />
  </div>
</template>
<script>

import Snap from "snapsvg";  // <-- triggers our import resolution

export default {

  data() {
    return { mySVG: undefined };
  },

  mounted() { 
    this.mySVG = window.Snap("#mySVG");
  },

  methods: { 
     // draw amazing stuff here with this.mySVG
  }
}

</script>

Troubleshooting webpack-chain

The vue-cli includes commands to dump a copy of the Webpack configuration with your webpack-chain modifications applied to it.

vue inspect > ejected.js

You can open this file to look and see how the chain was applied to generate corresponding Webpack rules. In our case, this is what we got for the vue.config.js file described above…

  resolve: {
    alias: {
      '@': '/Volumes/Hactar/Users/jscheller/vue/myproject/src',
      vue$: 'vue/dist/vue.runtime.esm.js',
      snapsvg: 'snapsvg/dist/snap.svg.js'
    },
   
    [ ... and about 1000 lines later... ]
 
      /* config.module.rule('Snap') */
      {
        test: '/Volumes/Hactar/Users/jscheller/vue/myproject/node_modules/snapsvg/dist/snap.svg.js',
        use: [
          /* config.module.rule('Snap').use('imports-loader') */
          {
            loader: 'imports-loader?this=>window,fix=>module.exports=0'
          }
        ]
      }

A great thing about running the ‘vue inspect’ command is that it will give you console output if your chain rules have a problem. If you build up a webpack-chain in your vue.config.js file that doesn’t seem to be working right, this is probably one of the first things you should check to see if it’s actually getting applied correctly.

Save Money by Transferring Domain Registrations from Bluehost to Cloudflare

If you’re a web developer you’ve probably had way too many ideas for way too many amazing projects, and you’ve promptly gone out and registered domain names for each one of them. That feels like progress, right? But before long, you’ve got a domain registrar account with 100 random domains that are auto-renewing for $16 every year.

Obviously the best way to save money is to let some of those domains expire, and I’ve gotten a bit more realistic about the ones I’ve held onto. I still have quite a collection of family names and actual honest-to-goodness projects that made it beyond the “what-a-great-idea-go-register-it!” stage. So my annual registrar bill does look scary when I add it all up around income tax time.

Cloudflare came down the chimney with an early Christmas present, however. And it’s a big one.

If you’re not familiar with Cloudflare, they create a layer between your actual web hosting and the visitors that show up to view your content. That layer acts as both a CDN and a security service, so Cloudflare accelerates your website site performance and protects it from (among other things) DDoS attacks. They do this by taking over the DNS for your domain, directing requests through their servers first to cache and deliver your content. You still need to host your site somewhere, and you still need to register your domain somewhere, but by putting Cloudflare between visitors and your site, it’s like having a bouncer at the door that helps move everybody in and out of the business faster and keeps the riff-raff outside in the snow.

The basic level of Cloudflare services are both amazing and free. Not free as in “free trial” or free as in “you’ll need to upgrade to do anything useful” but free as in “how are they doing this for nothing?!” free. I have been using Cloudflare for years on DadsWorksheets.com which serves a significant amount of traffic, and not only has the security functionality been a win but Cloudflare has definitely saved me from needing to host on a larger server (sorry, Linode!)

Anyway, back to Cloudflare’s Christmas delivery. Cloudflare announced that they were rolling out domain registrar services, and even better that they would be providing close to wholesale rates to Cloudflare customers. What this means for us compulsive domain name collectors is that you can get rates closer to $8 instead of paying $16+ for our precious domain gems each year. Plus, since I’m using Cloudflare for most of my live sites anyway, it’s one less place to deal with accounts and record changes and those bizarre who-is-serving-what questions that come up when you’ve got 37 domains online.

You can read more about Cloudflare’s registrar announcement here…

https://blog.cloudflare.com/using-cloudflare-registrar/

I’ve been registering domains at Bluehost, which I know isn’t ideal from either a management point of view or pricing. I started there back when their registration rates were a lot more reasonable, but it’s gradually become a profit center with add ons like “registration privacy” and other services. If only some of that money had gone into updating their web UI for managing domains, the last ten years of escalating registration fees might have felt less like a mugging.

Navigating the interface to get your domains moved from Bluehost (or perhaps similar other commodity hosts like GoDaddy or 1&1) to Cloudflare can be a little unruly, so this post will quickly walk you through the steps. I’ve moved roughly a dozen domain registrations to Cloudflare now and it’s fairly painless, but you do have to go back and forth between the sites a bit to actually complete all the steps, and even Cloudflare’s service (which is still a bit new) can be less than clear in a few spots.  Hopefully this post will save you some trouble if you’re making the same changes.

Note that even if you’re not hosting your actual website at the site where you register your domains, you can still move your registrar and DNS services to Cloudflare. Because your domain registrar and DNS and the actual web site hosting are different services, it’s relatively transparent which you move things around.

That said, if you are doing some non-standard DNS things, or you frankly have no idea what DNS does or how it works, this might be an opportunity to learn or ask that techie buddy of yours to glance over your site before you jump in.

But if you’ve got your Batman cowl on, the basic steps we’ll go over look like this…

Steps to Migrate Domain Registration from Bluehost to Cloudflare

  1. Create a Cloudflare account if you don’t have one.
  2. Activate your site on Cloudflare to start serving DNS records from Cloudflare instead of your current host.
  3. Enter Cloudflare’s DNS server names at your current registrar to point your domain to Cloudflare.
  4. Make Sure Your Site is Working!
  5. Start the registrar transfer process, including entering the domain’s transfer authorization code.
  6. Go back to your registrar and confirm that the transfer to Cloudflare is okay. This is the step that’s easy to overlook.
  7. Go back to Cloudflare and verify it’s now the registrar.

Let’s go over these now in a bit more detail.

Step 1: Create a Cloudflare Account

If you don’t yet have a Cloudflare account, go to their home page and click the “Sign Up” button and go through the usual email verification steps.

Step 2: Activate Your Site

Once you log into your Cloudflare account, you need to add your site to Cloudflare by clicking the “Add site” link near the upper right part of the page.

Add a Site to Cloudflare

This turns on all the Cloudflare wonderfulness for your domain, but doesn’t get you yet to the actual registrar part of the process (we’ll cover that in a second).

Again, the free plan is probably all you need. You can upgrade to plans that offer a few more performance enhancements and security, but if you’re coming from bare-metal hosting somewhere else, the free plan is already a huge infrastructure upgrade.

As you go through the steps to activate your site, Cloudflare will scan your current DNS records and make a copy of them to serve in place of your current DNS provider. It will get everything ready to redirect your site through Cloudflare’s servers so that the CDN and security features will be activate once you change the DNS server names in the next step, but nothing up to this point has changed the way your site is currently being served.

Step 2: Update your DNS servers

Your site is still being served exactly the same way it was before because it’s still going through whatever DNS services are in place. To get Cloudflare to recognize that your site is “active” you need to change the DNS name servers. These are entries at your current registrar that tell the whole of the internet how to resolve names to IP address for your domain, and by changing these server names Cloudflare is able to tell that you actually own the registration for the site.

At the end of the site setup process in Cloudflare, you’ll get a page that shows you the new DNS server names. You can also find these at any time by looking at the “DNS” tab when you’re managing any particular site in Cloudflare’s dashboard.

The place you enter these new DNS server names is on the “Name Servers” tab inside Bluehost. It’d be useful to keep track of the existing values you have there just in case you want to roll things back.

The page at the end of the Cloudflare setup process looks like the window on the left in this screen shot, and you’ll want to copy those server names over to Bluehost (or your current registrar) in the indicated places in the window on the right (Click to expand the image if you need to see more detail)…
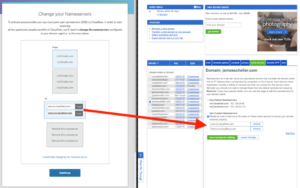
Cloudflare DNS Change

When you click the green button to save the changes in Bluehost, it’ll take some time for the name server records to get distributed to all the servers that cache domain DNS information around the internet, but within a few minutes you should be able to log back into Cloudflare and the domain should show “Active” on the main dashboard page when you log in…

Cloudflare Active Domain

Step 4: Verify Your Site is Working

Verify your site is working as expected, including any other services like emails or APIs. Again, Cloudflare should have copied your existing DNS records and updated them appropriately, but this is your chance to figure it out.

If something seems out of whack, put the old DNS name servers back in, wait for propagation and then dig deeper to see what’s going on. Putting the DNS server names back as they were will restore everything exactly to as it was before (Cloudflare is completely bypassed) so this can function as a clear on/off switch if anything is misbehaving.

But if all goes well, at this point, Cloudflare is providing its CDN and security services for your site and we’re ready to move to updating the domain registrar.

Step 5: Start the Registrar Transfer

When you log into your Cloudflare dashboard, you’ll see a list of your sites and (as of December 2018) a purple box that invites you to transfer domains. On my account it looks like this…

Cloudflare Domain Registrar

…but you may see a similar message inviting you to “claim your place in line” for an invitation. Cloudflare is still rolling this service out in scheduled waves so they don’t get overwhelmed, but as of this writing you should only be waiting a week or two to get through the queue, and hopefully it will be wide open shortly. If you are in the queue, you’ll need to log back in to Cloudflare periodically to see if the registrar functionality has opened up to you or not… They don’t seem to send an email or any kind of notification once you’ve reached the front of the queue.

Assuming you can register the domains, Cloudflare will let you select which active domains you want to transfer from Bluehost to Cloudflare. It will default to a list of all active Cloudflare domains.

Cloudflare will need a credit card and billing details during this process. It will charge you for one year’s domain registration as part of the transfer process. This is typical when transferring domains between registrars.

But before we get too far… That Bluehost registrar user experience that I’m sure you love as much as I do is going to need some attention from you. If you log back into your Bluehost account and go to the ‘Domains’ area of the site, you need to select your domain and make sure it is “Unlocked”. This is the page you’re looking at…
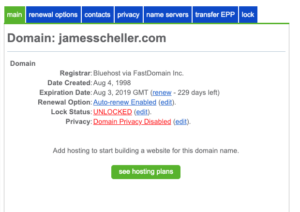
Bluehost Locked Domain

Note that “Lock Status” entry in the middle. If it shows “Locked” it will prevent a transfer from happening, and you should click “Edit” there to go to the lock panel and then choose to unlock the domain. I’ve had mixed results with the correct lock status showing there right away and it you have trouble it may be worth logging entirely out of the Bluehost interface and logging in a minute or two later to verify the change has taken effect. It’s not clear to me whether attempting to unlock the domain repeatedly when the status is showing “Locked” is toggling the state or consistently unlocking it, but it’s definitely a little flaky for me.

The next important thing you need out of Bluehost is the domain’s transfer EPP code. This is a sort of password that registrars use to make sure that a transfer request has been authorized by the actual owner of the site. It’s a random string the registrar generates, not something you’ve provided, and in Bluehost’s domain UI you’ll find it here…
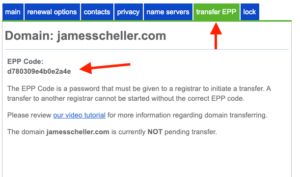
Bluehost EPP code

When you go through Cloudflare’s transfer process, it will ask you for this code…
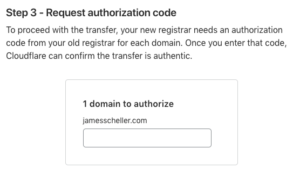
Cloudflare EPP authorization code for domain registrar

Note that I’ve shown the actual auth code in my screen shots here, but you should NEVER share this code publicly from your live registrar. Since I’ve already completed the domain transfer from Bluehost to Cloudflare, the EPP code here is essentially dead, but if you had a live site, that code would potentially let someone request a transfer of your domain. Whoops.

You’d think, of course, that you’d be done at this point, but going back to your Cloudflare dashboard and clicking the “Domain Registration” link you’ll see something like this…

Cloudflare Domain Invalid Auth Code

…and that leads us to an easy to overlook step.

Step 6: Confirm the Registrar Transfer

The error message in Cloudflare suggests that you didn’t copy the right EPP authorization code in, but in reality it’s simply complaining that the transfer was rejected by Bluehost.

In reality, the auth code is probably fine (you just copied and pasted it, probably) and this message in Cloudflare’s system should probably say something more like “Transfer rejected by original registrar. Please verify authorization code or confirm the transfer at the old registrar’s interface.”

Because, that’s what you need to do here if you find yourself wandering back into Bluehost’s interface to make sure you copied the right thing out…
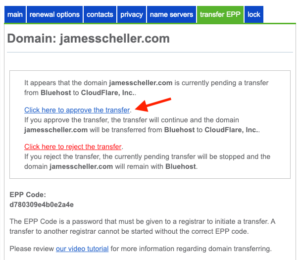
Bluehost confirm epp domain transfer

If you go back to the Bluehost transfer EPP tab, you’ll see something a bit different now. In addition to showing you the EPP code again, Bluehost is making darn certain that you want to stop paying those over-priced registrar fees, so it’s blocking the transfer to Cloudflare until you click that blue link. So click away.

Step 7: Verify Cloudflare is Your Registrar

A moment or two later, Cloudflare should recognize that it’s the official registrar for your domain. You can verify this by clicking the “Domain Registration” link at the top of your Cloudflare dashboard, or if you click the domain itself from the dashboard home page, there’s a section in the right rail that shows your registration details…

Cloudflare Dashboard Domain Registration


Thoughts and Insights

I’m not affiliated with Cloudflare, but I’m a huge fan of their service. Their new registrar is going to be game changing, and it’s incredible how much money I’ve spent over the years as traditional registrars have raised fees.

Cloudflare’s registar service is still new and has a few hiccups. I don’t see an obvious way to register an entirely new domain name yet, so it seems you can only transfer existing registrations. Maybe that’s a ploy to encourage people to take advantage of those introductory loss-leader registrations many other services offer. And it looks like right now transfers out of Cloudflare require a visit with customer support, so it’s probably not a great place for active domain traders.

But if this service is like everything else they do, Cloudflare’s registrar going to get a lot better a lot sooner and I’m pleased to be coming to one spot now for my CDN, DNS, security and domain registration. And I’m frankly looking forward to sending these guys more money once my sites get large enough to justify some of their higher performance add-ons.

Meanwhile, thanks Cloudflare, for making another corner of the internet a little nicer.



How DNS Mistakes Can Score You a Google Manual Penalty

When your livelihood is tied to website traffic, one of the worst things you can wake up to is an email from Google Search Console.

I’m no stranger to bad news from the Big G and the non-communication and horror movie circular forward-you-to-the-right-group conversations that go along with any dialog you might think would rectify the problem. I spent six months trying to get my site off the AdExchange blacklist because of a minor AdWords violation on an account I didn’t even know was still serving $10 per month worth of ads. Which sounds insane, I know, because my ancient AdWords account should have nothing at all to do with my display partner’s Ad Exchange account, but believe me… What a mess. In that case, I was fortunate that a friend-of-a-friend-of-a-friend had a direct Google rep with a back-door into some super-secret re-evaluation queue not visible to mere mortals.

But my real talent seems to be using DNS records to try to shoot myself in the hard drive. A couple of years back I managed to take my math worksheets site offline with a DNS record change that I thought was working fine because of a forgotten localhost entry that resolved to the right address. When I saw a huge traffic drop in Google Analytics the next day, I immediately knew I’d messed up, but that brief span of time offline wiped out almost six months worth of SEO ranking progress. I’m a huge fan of Uptime Robot now.

Not How You Want to Start your SEO Day

Subdomain DNS Records are Dangerous

So you can bet, I’ve become pretty dang careful with DNS records pointed to my primary site. But, I’m also a developer.

There’s that old adage, “Real Developers Test It In Production,” something you should not ascribe to, so naturally I sandbox development and staging servers on subdomains. And of course, a subdomain means a DNS A/AAAA record that needs your full attention. And that, friends, is the beginning of the reason why I got another Google Search Console email a couple of days ago and why I’m doing something different with my dev servers going forward.

The obvious scary thing in the email’s subject line was the words “Hacked Content” and then, if that wasn’t enough to make every hair stand on end, the body text shouted “manual penalty” with a handy link right to the page on Google Search Console, which provided a big fat confirmation of every bit of bad news. Great.

After I calmed down a bit, I settled in to see what was going on. Google helpfully provided links to some of the pages that it claimed were hacked, and none of the URLs looked right at all. None were coming from the main www subdomain, which immediately lowered my heart rate, but even the URLs to the development subdomain they all referenced looked really weird.

And then, it downed on me, that development subdomain wasn’t even around any more. I had decommissioned the server it was running under months ago, so that content couldn’t even be coming from a machine I was using. That server was gone, but its IP address was still resolving. And when I’d surrendered that IP address back to Linode, it meant that basically anybody else could start using a new server with that IP for their own purposes. So when someone else spun up a new site, it became reachable via a subdomain I still had defined. DNS induced brain damage, part two it seemed.

So in this case, there wasn’t any “hacked content” anywhere, it was just that my DNS made it look as though I was serving duplicate content from some random site out from under a subdomain I controlled. And while the manual penalty suggested it was only relevant to URL patterns that matched that subdomain, it was also pretty specific that the manual penalty affected the overall reputation and authority of everything under the domain, so fixing it right away was a priority.

The obvious and easy solution was just to delete the DNS record pointing to that subdomain, wait for propagation and then file a reconsideration request through Search Console. Even though the reconsideration request indicated that Google took “several weeks” to review anything, I did thankfully get a follow up email in roughly 36 hours that said the penalty had been removed.

I’m not sure if I took a short term traffic hit or not on the main domain as all of these events transpired over a weekend, and the traffic pattern for this site drops off significantly there and around the holidays in general. Otherwise the site traffic looks normal in spite of the brief stint with the manual penalty in place. So far, it looks like I dodged whatever bullet might have been headed my way. I think an important contributor to this rapid turnaround and preserving rankings was that I fixed the issue rapidly and explained in clear detail in the reconsideration request what happened and how I resolved it, and specifically that it wasn’t actually an actual malicious hack.

But the key take away is not just to be super careful managing your DNS entries, but also to run any publicly visible development and test boxes under a domain that has nothing to do with your main property.

If this had been an actual hack of a machine we were using for something critical, and maybe one that appeared more malicious than serving duplicate content, that manual penalty could have had a real negative financial consequence for the main site. It’s hard enough to secure a production server, but a development machine that is transient in nature is probably going to be less secure, and potentially a softer attack vector.

SEO is hard work, and shooting yourself in the DNS is pretty easy. If a hack, or even just a DNS misconfiguration, of a dev machine can lead to a manual penalty that affects not just the subdomain, but your entire web property, it’s much wiser to have it far away from your main domain. In the future, I’ll be running any publicly visible dev machines under an entirely different domain name for this reason.

Eclectic Observations from Arriving Late to the LinkedIn Party

After having been bitten quite hard by Google’s August algorithm update, I’ve been on a mission to establish a bit more EAT related to my online presence in hopes of a recovery. If you’re wondering what the heck I’m talking about, EAT is a recent bit of buzz phraseology that has those of us with an interest in SEO pounding our forks at the dinner (i.e., revenue) table and hollering about the latest batch of secret ingredients in Google’s ranking algorithm sauce.

EAT in SEO parlance stands for “Expertise, Authority and Trust” and from all impressions, this seems to be a subjective measurement of a site’s credibility assigned by a human quality ranker at the Big G. And fundamentally this comes down to identifying people associated with sites, and establishing that those sites are built and run by bonafide credentialed humans and not Russian robots or other nefarious automatons. Google has a document that gives some vague hand-wavy instructions for its human raters to follow to find out more about a site’s pedigree, typically by looking off-site for items on the EAT menu.

I’ve been studying this menu for a while now, but one item off the appetizer list that I completely missed was setting up a personal profile on LinkedIn and getting a company page listed for DadsWorksheets.

So let me be candid here. I’m a terrific introvert. Where lately people run around denouncing the looming perils of social media addiction, I’m one of those dungeon dwellers whose arm need be twisted nigh off before I’ll log into my FaceBook page. And, yes, if you’re one of the hundred-odd people who’ve sent me a LinkedIn invitation in the last few years, I hope you don’t feel scorned that I didn’t join you and I’ll ask your forgiveness now… It’s just that I never actually setup an account until today.

But after arriving catastrophically late to the party and reaching out to a dozen connections who might take some pity on my apparently self-induced social media ostracism, I did have a few observations coming in the door:

  • Wow, most of you old friends look quite professional in your profile pictures. I find myself wondering if I should shed my sunglasses, or if there’s some value in maintaining profile picture continuity across StackOverflow, GitHub, Discord and all the other tech-oriented services I actually do lurk through regularly.
  • Indeed, your profile pictures match some envious résumés and work history.  And interestingly, some glaring omissions. I’m looking at you, dear Veebo alumi, and wondering about airing those battle scars publicly as well.
  • Even more nostalgia inducing than the prospect of updating my own dusty CV is seeing where so many of you have travelled since we parted company. Being in this soloprenuer consulting thing for so long, it’s easy to forget how many interesting places with great people you’ve worked with. It’s good to see you all again.

So maybe this social media thing isn’t all the cat videos and political noise it’s seemed to be, and I just needed to find the right place. We’ll see. For now, the hour or two on LinkedIn today was actually kind of fun.

Adding Snap.svg to Vue.js and Nuxt.js Projects

This post may be out of date for what you need… There’s an updated article that deals with adding Snap.svg to projects created with the vue-cli 3.0 and more recent 2.x versions of Vue.js. Click here to read it!

SVG is amazing, and if you’re building any custom vector graphics from your client code, one of the easiest libraries to use is Snap.svg. I’ve used it in a number of projects, including vanilla JavaScript and various transpiling setups including Transcrypt.

I’m trying to go a little more mainstream after wasted years of time on fringe technologies that fell out of favor.

I’m spending a lot of time these days learning Vue.js and really hoping this is going to be a worthwhile long term investment in my skillset. So it was only a matter of time before I found myself needing to get Snap.svg working in my Vue.js projects, which meant some extra fiddling with WebPack.

Getting Snap.svg Working with Vue.js

Out of the gate, there’s some hurdles because Snap mounts itself on the browser’s window object, so if you’re trying to load Snap through WebPack (as opposed to just including it in a project using a conventional script tag), you need to do some gymnastics to get WebPack’s JavaScript loader to feed the window object into Snap’s initialization logic. You can find an overview of the problem in this GitHub issue which illustrates the obstacles in the context of using React, but the issues as they relate to Vue.js are the same.

I’m assuming you have a Vue.js webpack project that you started with vue-cli or from a template that has everything basically running okay, so you’ve already got Node and webpack and all your other infrastructure in place.

For starters, you’ll want to install Snap.svg and add it to your project dependencies, so from a terminal window open and sitting in the directory where your project’s package.json/package-lock.json sit…

npm install --save snapsvg

That will download and install a copy of the Snap.svg source into your node_modules directory and you’ll have it available for WebPack to grab.

Normally you’d be able to use a package installed like this by using an import statement somewhere, and you’d think you could do this in your Vue project’s main.js file, if you start down this path you’ll get the window undefined issue described in that GitHub link above.

The tricky bit though is getting WebPack to load the Snap properly, and to do that we’ll need a WebPack plugin that lets us load as a JavaScript dependency and pass some bindings to it. So, in that same directory install the WebPack imports-loader plugin…

npm install --savedev imports-loader

To tell the imports-loader when it needs to do its magic, we have to add it to the WebPack configuration. I changed my webpack.base.conf.js file to include the following inside the array of rules inside the module object…

 module: {
   rules: [
      ...
       {
       test: require.resolve('snapsvg'),
       use: 'imports-loader?this=>window,fix=>module.exports=0',
       },
      ...
     ]
   },

Now we can load Snap.svg in our JavaScript, but imports-loader uses the node require syntax to load the file. So in our main.js, we can attach Snap.svg by telling WebPack to invoke the exports loader like this…

const snap = require(`imports-loader?this=>window,fix=>module.exports=0!snapsvg/dist/snap.svg.js`);

…and then attach it to our root Vue instance, still in main.js, something like this…

const vueInstance = new Vue( {
 el: '#app',
 snap,
 router,
 axios,
 store,
 template: '<App/>',
 components: { App }
} );

export { vueInstance };

There is some redundancy in that require() call and the way we setup the module resolution in the WebPack configuration. I’m fuzzy about why I seemed to need this in both spots, but it works so I’m running with it. If you have insights they’d be appreciated; let me know in the comments.

Getting Snap.svg Working with nuxt.js

Nuxt requires a slightly different twist, because as you’re aware a typical Nuxt project doesn’t have either a main.js file or a native copy of the WebPack configuration. We need to make the same changes, but just in a slightly different spots.

You need to install both snapsvg and imports-loader just like we did above…

npm install --save snapsvg
npm install --savedev imports-loader

The way we modify the WebPack configuration in a Nuxt project is to create a function that accepts and extends the WebPack configuration from with your nuxt.config.js file…

/*
 ** Build configuration
 */

 build: {
   extend(config, ctx) {
      config.module.rules.push( {
        test: require.resolve('snapsvg'),
        use: 'imports-loader?this=>window,fix=>module.exports=0',
       } );
     }
   }

Since we don’t have a main.js, we need to use a Vue.js plugin to inject shared objects and code into Vue. In your projects plugins folder, create a file named snap.js that contains code to attach a snap object created again using imports-loader…

export default ({ app }, inject) => {
  app.snap = require(`imports-loader?this=>window,fix=>module.exports=0!snapsvg/dist/snap.svg.js`);
}

…and back in your nuxt.config.js file, include this plugin…

plugins: [
   ...
   {src: '~/plugins/snap'},
   ...
],

These approaches seem to work well for me in both a standard Vue.js and Nuxt.js projects, but both of these setups have been cobbled together from reading a lot of other bits and pieces… If you’ve got a better or approach or see a way to clean up what I’ve done, please let me know.

Meanwhile, good luck with your Snap and Vue projects!


Migrating from Dasher.tv to the AnyBoard App

For a little over a year, I’ve been running a fantastic NOC-style dashboard on the AppleTV in my office courtesy of a nifty app called Dasher. It took a little Python gymnastics, but I was able to pull data from Google Analytics, Ahrefs and Staq to assemble a consolidated view of what’s happening at DadsWorksheets.com, all of which helps keep my eye on getting things done there.

Much of the work in this is a Python script that runs locally to collect the data. I’ve been pushing that data up to Dasher’s servers, which then gets fed back to the Dasher app on the AppleTV. But I’ve been concerned for quite some time because this app never got the love or attention it deserved, I’m sure in large part because it required chattering through a web API to push the data. So as well as this worked, it was never really going to be broadly adopted by anyone but us propeller heads.

That means I knew the hammer was going to fall on this little gem at some point, and sure enough I got the email yesterday that Dasher was shutting down in May.

I rely on this dashboard enough that Dasher’s demise caused me to peel off for part of yesterday to find a replacement. I didn’t want to spend the next few weeks with some thought gnawing the back of my head, so I at least needed a plan.

And there are several good alternative dashboard apps out there, many of which with integrations to Analytics plus 100 other services I didn’t need. These are all great solutions, but they also all came with $10 per month fees, and missing integrations to oddball places like Staq and some of the other custom bits that I’d still have to jump through hoops to get fed anyway.

I’m already collecting all the data and generating a few simple charts in Pillow, so sending it somewhere that would ultimately show up on the AppleTV shouldn’t be hard. If there was even a simple version of Safari or another browser I could load on the AppleTV to bring up and auto-refresh a web page, I’d have a solution by kicking out some HTML or a even a full blown Vue.js app, but short of renewing my Apple developer account, reinstalling Xcode and side-loading tvOSBroswer, there isn’t much on the map.

That’s why I’m so glad I found AnyBoard. This is a great little app that does everything and more that Dasher did, but without putting a third party server in the middle.

When you setup Anyboard, you point it at a JSON file that you’ve made visible somewhere. That JSON file describes how one or more dashboards are laid out and also where to get the data. The data comes from other JSON files you identify using URLs in the configuration. By refreshing those JSON files with new data, the Anyboard app will have access to live data feeds from whatever sources you can cobble together. There’s also a pre-built setup for Nagios, but I didn’t play with it here.

Because all of the dashboard data is moving between the Apple TV and the local network, you can configure Anyboard to hit URLs on a local server, so your dashboard configuration and your actual data can stay inside the building. Also, you’re not dependent on a third party developer necessarily pulling the plug on the API that feeds the app. So I’m anticipating a very long relationship with Anyboard here.

Not that I think there’s anything to worry about. I traded a few emails with Ladislav at sféra, the Anyboard developer, and he was eager to help work through some odd things I was doing in my configuration and answer a few questions I had. These are the kinds of guys worth our support.

I was able to port my Dasher configuration over to Anyboard in about half a day, and the resulting dashboards look better than they ever have. Anyboard is free, there’s no premium version (which I would have gladly bought) or subscription fees (which I would have ruled out). It’s a solid app that does an important job and does it well. I can see a few minor areas that I hope Ladislav polishes up in future builds, but if you’re comfortable cranking out a few simple JSON files, I can definitely recommend Anyboard as an AppleTV dashboard solution without hesitation.

You can find out more about Anyboard at https://anyboard.io/.