If you’re a web developer you’ve probably had way too many ideas for way too many amazing projects, and you’ve promptly gone out and registered domain names for each one of them. That feels like progress, right? But before long, you’ve got a domain registrar account with 100 random domains that are auto-renewing for $16 every year.
Obviously the best way to save money is to let some of those domains expire, and I’ve gotten a bit more realistic about the ones I’ve held onto. I still have quite a collection of family names and actual honest-to-goodness projects that made it beyond the “what-a-great-idea-go-register-it!” stage. So my annual registrar bill does look scary when I add it all up around income tax time.
Cloudflare came down the chimney with an early Christmas present, however. And it’s a big one.
If you’re not familiar with Cloudflare, they create a layer between your actual web hosting and the visitors that show up to view your content. That layer acts as both a CDN and a security service, so Cloudflare accelerates your website site performance and protects it from (among other things) DDoS attacks. They do this by taking over the DNS for your domain, directing requests through their servers first to cache and deliver your content. You still need to host your site somewhere, and you still need to register your domain somewhere, but by putting Cloudflare between visitors and your site, it’s like having a bouncer at the door that helps move everybody in and out of the business faster and keeps the riff-raff outside in the snow.
The basic level of Cloudflare services are both amazing and free. Not free as in “free trial” or free as in “you’ll need to upgrade to do anything useful” but free as in “how are they doing this for nothing?!” free. I have been using Cloudflare for years on DadsWorksheets.com which serves a significant amount of traffic, and not only has the security functionality been a win but Cloudflare has definitely saved me from needing to host on a larger server (sorry, Linode!)
Anyway, back to Cloudflare’s Christmas delivery. Cloudflare announced that they were rolling out domain registrar services, and even better that they would be providing close to wholesale rates to Cloudflare customers. What this means for us compulsive domain name collectors is that you can get rates closer to $8 instead of paying $16+ for our precious domain gems each year. Plus, since I’m using Cloudflare for most of my live sites anyway, it’s one less place to deal with accounts and record changes and those bizarre who-is-serving-what questions that come up when you’ve got 37 domains online.
You can read more about Cloudflare’s registrar announcement here…
https://blog.cloudflare.com/using-cloudflare-registrar/
I’ve been registering domains at Bluehost, which I know isn’t ideal from either a management point of view or pricing. I started there back when their registration rates were a lot more reasonable, but it’s gradually become a profit center with add ons like “registration privacy” and other services. If only some of that money had gone into updating their web UI for managing domains, the last ten years of escalating registration fees might have felt less like a mugging.
Navigating the interface to get your domains moved from Bluehost (or perhaps similar other commodity hosts like GoDaddy or 1&1) to Cloudflare can be a little unruly, so this post will quickly walk you through the steps. I’ve moved roughly a dozen domain registrations to Cloudflare now and it’s fairly painless, but you do have to go back and forth between the sites a bit to actually complete all the steps, and even Cloudflare’s service (which is still a bit new) can be less than clear in a few spots. Hopefully this post will save you some trouble if you’re making the same changes.
Note that even if you’re not hosting your actual website at the site where you register your domains, you can still move your registrar and DNS services to Cloudflare. Because your domain registrar and DNS and the actual web site hosting are different services, it’s relatively transparent which you move things around.
That said, if you are doing some non-standard DNS things, or you frankly have no idea what DNS does or how it works, this might be an opportunity to learn or ask that techie buddy of yours to glance over your site before you jump in.
But if you’ve got your Batman cowl on, the basic steps we’ll go over look like this…
Steps to Migrate Domain Registration from Bluehost to Cloudflare
- Create a Cloudflare account if you don’t have one.
- Activate your site on Cloudflare to start serving DNS records from Cloudflare instead of your current host.
- Enter Cloudflare’s DNS server names at your current registrar to point your domain to Cloudflare.
- Make Sure Your Site is Working!
- Start the registrar transfer process, including entering the domain’s transfer authorization code.
- Go back to your registrar and confirm that the transfer to Cloudflare is okay. This is the step that’s easy to overlook.
- Go back to Cloudflare and verify it’s now the registrar.
Let’s go over these now in a bit more detail.
Step 1: Create a Cloudflare Account
If you don’t yet have a Cloudflare account, go to their home page and click the “Sign Up” button and go through the usual email verification steps.
Step 2: Activate Your Site
Once you log into your Cloudflare account, you need to add your site to Cloudflare by clicking the “Add site” link near the upper right part of the page.

This turns on all the Cloudflare wonderfulness for your domain, but doesn’t get you yet to the actual registrar part of the process (we’ll cover that in a second).
Again, the free plan is probably all you need. You can upgrade to plans that offer a few more performance enhancements and security, but if you’re coming from bare-metal hosting somewhere else, the free plan is already a huge infrastructure upgrade.
As you go through the steps to activate your site, Cloudflare will scan your current DNS records and make a copy of them to serve in place of your current DNS provider. It will get everything ready to redirect your site through Cloudflare’s servers so that the CDN and security features will be activate once you change the DNS server names in the next step, but nothing up to this point has changed the way your site is currently being served.
Step 2: Update your DNS servers
Your site is still being served exactly the same way it was before because it’s still going through whatever DNS services are in place. To get Cloudflare to recognize that your site is “active” you need to change the DNS name servers. These are entries at your current registrar that tell the whole of the internet how to resolve names to IP address for your domain, and by changing these server names Cloudflare is able to tell that you actually own the registration for the site.
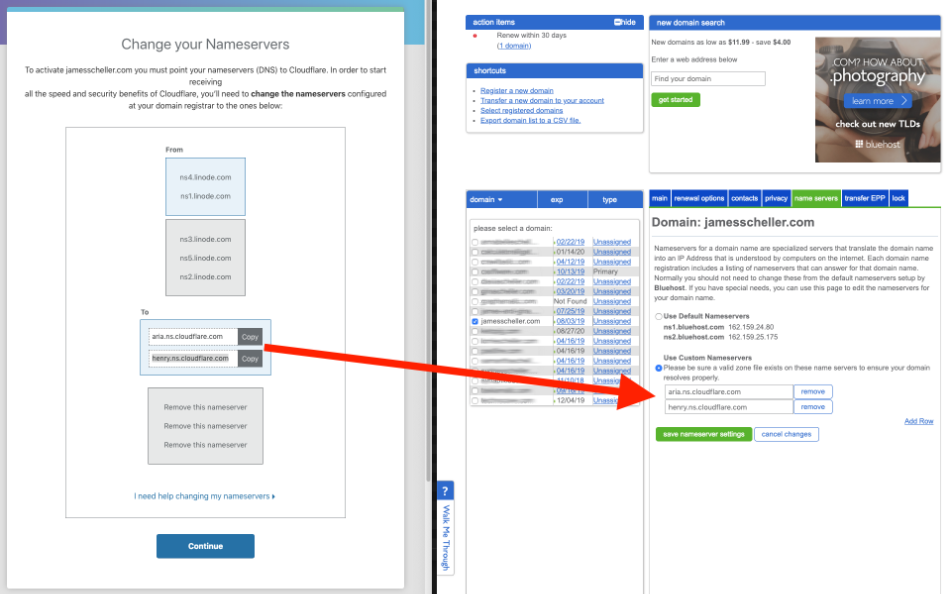
At the end of the site setup process in Cloudflare, you’ll get a page that shows you the new DNS server names. You can also find these at any time by looking at the “DNS” tab when you’re managing any particular site in Cloudflare’s dashboard.
The place you enter these new DNS server names is on the “Name Servers” tab inside Bluehost. It’d be useful to keep track of the existing values you have there just in case you want to roll things back.
The page at the end of the Cloudflare setup process looks like the window on the left in this screen shot, and you’ll want to copy those server names over to Bluehost (or your current registrar) in the indicated places in the window on the right (Click to expand the image if you need to see more detail)…

When you click the green button to save the changes in Bluehost, it’ll take some time for the name server records to get distributed to all the servers that cache domain DNS information around the internet, but within a few minutes you should be able to log back into Cloudflare and the domain should show “Active” on the main dashboard page when you log in…

Step 4: Verify Your Site is Working
Verify your site is working as expected, including any other services like emails or APIs. Again, Cloudflare should have copied your existing DNS records and updated them appropriately, but this is your chance to figure it out.
If something seems out of whack, put the old DNS name servers back in, wait for propagation and then dig deeper to see what’s going on. Putting the DNS server names back as they were will restore everything exactly to as it was before (Cloudflare is completely bypassed) so this can function as a clear on/off switch if anything is misbehaving.
But if all goes well, at this point, Cloudflare is providing its CDN and security services for your site and we’re ready to move to updating the domain registrar.
Step 5: Start the Registrar Transfer
When you log into your Cloudflare dashboard, you’ll see a list of your sites and (as of December 2018) a purple box that invites you to transfer domains. On my account it looks like this…

…but you may see a similar message inviting you to “claim your place in line” for an invitation. Cloudflare is still rolling this service out in scheduled waves so they don’t get overwhelmed, but as of this writing you should only be waiting a week or two to get through the queue, and hopefully it will be wide open shortly. If you are in the queue, you’ll need to log back in to Cloudflare periodically to see if the registrar functionality has opened up to you or not… They don’t seem to send an email or any kind of notification once you’ve reached the front of the queue.
Assuming you can register the domains, Cloudflare will let you select which active domains you want to transfer from Bluehost to Cloudflare. It will default to a list of all active Cloudflare domains.
Cloudflare will need a credit card and billing details during this process. It will charge you for one year’s domain registration as part of the transfer process. This is typical when transferring domains between registrars.
But before we get too far… That Bluehost registrar user experience that I’m sure you love as much as I do is going to need some attention from you. If you log back into your Bluehost account and go to the ‘Domains’ area of the site, you need to select your domain and make sure it is “Unlocked”. This is the page you’re looking at…
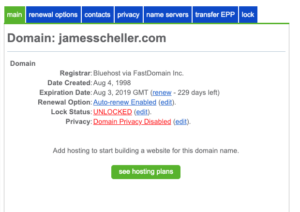
Note that “Lock Status” entry in the middle. If it shows “Locked” it will prevent a transfer from happening, and you should click “Edit” there to go to the lock panel and then choose to unlock the domain. I’ve had mixed results with the correct lock status showing there right away and it you have trouble it may be worth logging entirely out of the Bluehost interface and logging in a minute or two later to verify the change has taken effect. It’s not clear to me whether attempting to unlock the domain repeatedly when the status is showing “Locked” is toggling the state or consistently unlocking it, but it’s definitely a little flaky for me.
The next important thing you need out of Bluehost is the domain’s transfer EPP code. This is a sort of password that registrars use to make sure that a transfer request has been authorized by the actual owner of the site. It’s a random string the registrar generates, not something you’ve provided, and in Bluehost’s domain UI you’ll find it here…
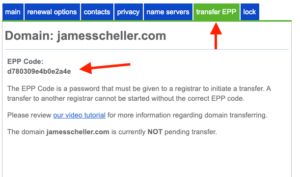
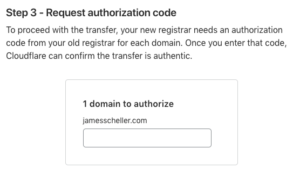
When you go through Cloudflare’s transfer process, it will ask you for this code…
Note that I’ve shown the actual auth code in my screen shots here, but you should NEVER share this code publicly from your live registrar. Since I’ve already completed the domain transfer from Bluehost to Cloudflare, the EPP code here is essentially dead, but if you had a live site, that code would potentially let someone request a transfer of your domain. Whoops.
You’d think, of course, that you’d be done at this point, but going back to your Cloudflare dashboard and clicking the “Domain Registration” link you’ll see something like this…
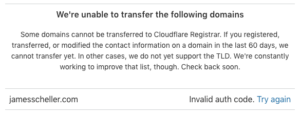
…and that leads us to an easy to overlook step.
Step 6: Confirm the Registrar Transfer
The error message in Cloudflare suggests that you didn’t copy the right EPP authorization code in, but in reality it’s simply complaining that the transfer was rejected by Bluehost.
In reality, the auth code is probably fine (you just copied and pasted it, probably) and this message in Cloudflare’s system should probably say something more like “Transfer rejected by original registrar. Please verify authorization code or confirm the transfer at the old registrar’s interface.”
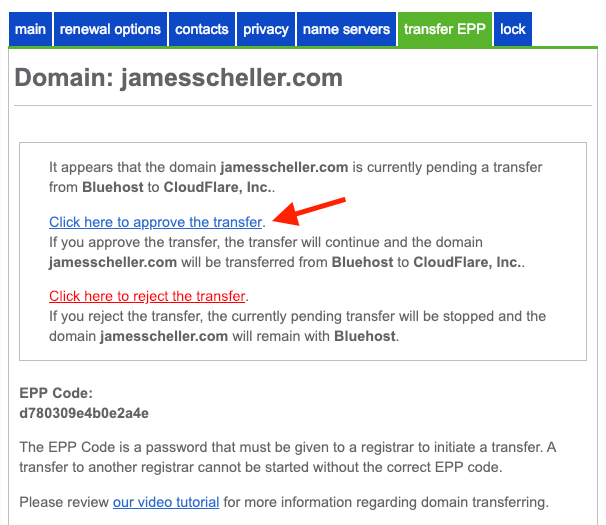
Because, that’s what you need to do here if you find yourself wandering back into Bluehost’s interface to make sure you copied the right thing out…

If you go back to the Bluehost transfer EPP tab, you’ll see something a bit different now. In addition to showing you the EPP code again, Bluehost is making darn certain that you want to stop paying those over-priced registrar fees, so it’s blocking the transfer to Cloudflare until you click that blue link. So click away.
Step 7: Verify Cloudflare is Your Registrar
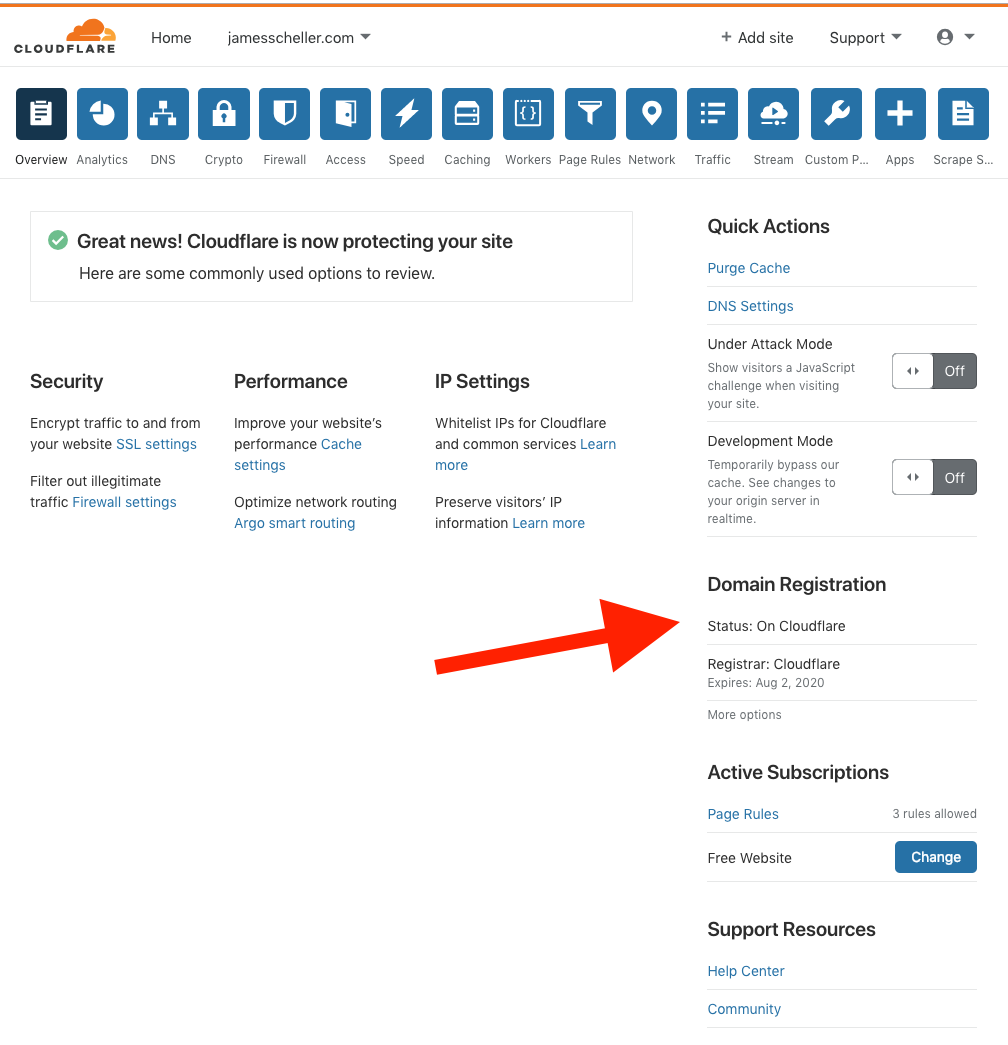
A moment or two later, Cloudflare should recognize that it’s the official registrar for your domain. You can verify this by clicking the “Domain Registration” link at the top of your Cloudflare dashboard, or if you click the domain itself from the dashboard home page, there’s a section in the right rail that shows your registration details…

Thoughts and Insights
I’m not affiliated with Cloudflare, but I’m a huge fan of their service. Their new registrar is going to be game changing, and it’s incredible how much money I’ve spent over the years as traditional registrars have raised fees.
Cloudflare’s registar service is still new and has a few hiccups. I don’t see an obvious way to register an entirely new domain name yet, so it seems you can only transfer existing registrations. Maybe that’s a ploy to encourage people to take advantage of those introductory loss-leader registrations many other services offer. And it looks like right now transfers out of Cloudflare require a visit with customer support, so it’s probably not a great place for active domain traders.
But if this service is like everything else they do, Cloudflare’s registrar going to get a lot better a lot sooner and I’m pleased to be coming to one spot now for my CDN, DNS, security and domain registration. And I’m frankly looking forward to sending these guys more money once my sites get large enough to justify some of their higher performance add-ons.
Meanwhile, thanks Cloudflare, for making another corner of the internet a little nicer.